次はちょっと本格的に論理回路をシミュレーションしてみます。
サンプルの論理回路は次のように作成しました。
`default_nettype none
`timescale 1ns / 1ps

module test1
(
    input wire RST_N,
    input wire CLK,

    input wire START,
    input wire STOP,
    output [7:0] COUNT
);

reg [7:0] reg_count;
reg reg_exec;

always @(posedge CLK or negedge RST_N) begin
    if(!RST_N) begin
        reg_exec <= 0;
    end else begin
        if(START) begin
            reg_exec <= 1;
        end else if(STOP) begin
            reg_exec <= 0;
        end
    end
end

always @(posedge CLK or negedge RST_N) begin
    if(!RST_N) begin
        reg_count <= 0;
    end else begin
        if(reg_exec) reg_count <= reg_count +1;
    end
end

assign COUNT = reg_count;

endmodule

`default_nettype none
次のような動作をする簡単な回路です。
STARTに1が入力されるとreg_execが1になって、STOPに1が入力されるとreg_execが0になりますreg_execが1ならreg_countがインクリメントしますreg_countをCOUNTに出力しますテストベンチは次のように作成しました。
#include "verilated.h"
#include "verilated_vcd_c.h"
#include "Vtest1.h"

#define CSCALE (10)

unsigned int mtime = 0; // current simulation time

int main (int argc, char **argv)
{
    Verilated::commandArgs(argc, argv);

    Vtest1* top = new Vtest1;

    Verilated::traceEverOn(true);
    VerilatedVcdC* tfp = new VerilatedVcdC;
    top->trace (tfp, 99);
    tfp->open ("sim_test1.vcd");

    top->RST_N = 0;
    top->CLK   = 0;
    top->START = 0;
    top->STOP  = 0;

    int mcycle = 0;

    while(!Verilated::gotFinish()){
        if((mtime % (CSCALE/2)) == 0) top->CLK = !top->CLK;    // create clock
        if((mtime % CSCALE) == 0) mcycle++;

        if(mcycle > 10) top->RST_N = 1;   // release reset

        if(mcycle > 20) top->START = 1;  // active for START

        if(mcycle > 30) top->START = 0;  // de-active for START

        if(mcycle > 160) top->STOP = 1;  // active for START

        if(mcycle > 170) top->STOP = 0;  // de-active for START

        top->eval();    // eval

        tfp->dump(mtime);

        if((mtime % CSCALE) == 0) {
            printf("Time %d: RST_N = %d, CLK = %d, START = %d, STOP = %d, COUNT = %d, reg_exec = %d\n", mtime, top->RST_N, top->CLK, top->START, top->STOP, top->COUNT, top->test1__DOT__reg_exec);
        }

        if(mcycle > 200) break;

        mtime++;
    }

    tfp->close();

    top->final();

    delete top;

    exit(0);
}この回路のクロックはCLKで動作周波数はif((mtime % (CSCALE/2)) == 0) top->CLK = !top->CLK;で作成しています。
CSACLEは#define CSCALE (10)でwhile(!Verilated::gotFinish())内のmtimeで計算しているのでmtimeの5回に1回、CLKがトグルします。
mcycleをCSACLEでインクリメントしているのでCLKの何クロック目のようなカウンタにしています。
RST、START、STOPはmcycleに合わせて値を設定しています。
STARTは次のように記載しているのでmcycleの21〜30の間、1にします。
        if(mcycle > 20) top->START = 1;  // active for START

        if(mcycle > 30) top->START = 0;  // de-active for START
テストベンチは単にC言語で実行されるのでシーケンシャル処理です。
つまり、mcycleが40のときのSTARTはmcycle > 20で一度、1になってからmcycle > 30で0になります。
そして、top->eval();の部分でシミュレーションが評価されます。
tfp->dump(mtime);のところで信号がダウンプされます。
次のようにコンパイルと実行してみましょう。
$ verilator -Wall --trace --cc test1.v --exe sim_test1.cpp
$ cd obj_dir/
$ make -f Vtest1.mk Vtest1
$ ./Vtest1実行が完了するとメッセージとともにsim_test1.vcdができています。
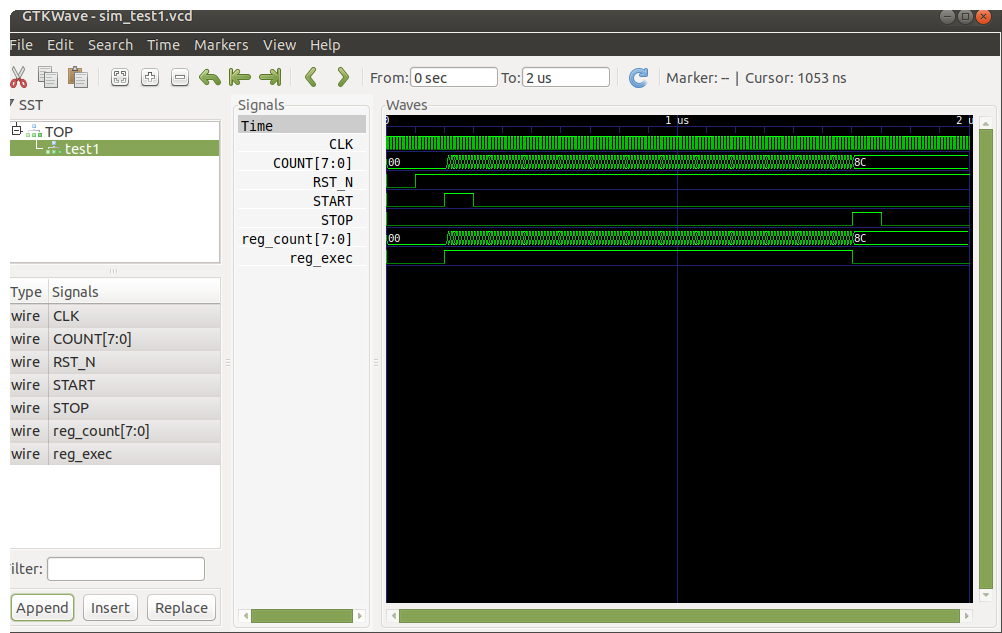
これは信号の波形です。
sim_test1.vcdは次のようにgtkwaveで波形を見ることができます。
$ gtkwave sim_test1.vcd